


Arduino + Internet Shield control LED
หายกันไปนานครับเพิ่งจะว่างเลยมาเขียนบนความสั้นๆ เพื่อแบ่งปันความรู้
พอดีมีน้องๆ ส่งเมล มาบอกว่าให้ทำตัวอย่าง Arduino + internet shield ควบคุม LED เลยไปได้ตัวอย่างตัวนี้มาเลยนำมาฝากกันครับ
สิ่งที่ต้องมีคือ arduino , Internet Shield , Led , สาย LAN
มาเริ่มกันเลยครับ ก็ต้องต่อ internet shield ดังรูปนี้ครับ
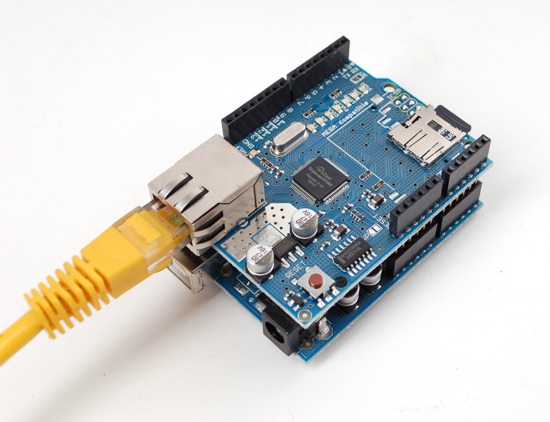
ต่อสาย LAN กับฝั่ง router wifi แล้วก็ มาดูcodeกันครับ
ต่อ led ที่ขา 8 นะครัยหรือใครจะประยุกต์ไปต่อกับขาอื่นๆก็ได้นะครับแต่ไม่ใช้ ขา 10-13 นะครับ
หรือจะดัดแปลงไปต่อกับ relay Module ก็ได้ครับ
code ที่ใช้ในการทดลองนะครับ
#include <SPI.h>
#include <Ethernet.h>
int led = 8;
String POST = "";
String SET = "";
// Enter a MAC address and IP address for your controller below.
// The IP address will be dependent on your local network:
byte mac[] = {
0xDE, 0xAD, 0xBE, 0xEF, 0xFE, 0xED };
IPAddress ip(192,168,1,177);
// Initialize the Ethernet server library
// with the IP address and port you want to use
// (port 80 is default for HTTP):
EthernetServer server(80);
void setup() {
// Open serial communications and wait for port to open:
Serial.begin(9600);
while (!Serial) {
; // wait for serial port to connect. Needed for Leonardo only
}
// start the Ethernet connection and the server:
Ethernet.begin(mac, ip);
server.begin();
Serial.print("server is at ");
Serial.println(Ethernet.localIP());
pinMode(led, OUTPUT);
}
void loop() {
// listen for incoming clients
EthernetClient client = server.available();
// digitalWrite(led, HIGH);
if (client) {
Serial.println("new client");
// an http request ends with a blank line
boolean currentLineIsBlank = true;
while (client.connected()) {
if (client.available()) {
char c = client.read();
Serial.write(c);
// if you've gotten to the end of the line (received a newline
// character) and the line is blank, the http request has ended,
// so you can send a reply
if (c == '\n' && currentLineIsBlank) {
// it is after the double cr-lf that the variables are
// read another line!
String POST = "";
while(client.available())
{
c = client.read();
// save the variables somewhere
POST += c;
}
if(POST != "")
{
if(POST == "led=1"){
SET = "on";
Serial.println("on");
}else{
SET = "off";
Serial.println("off");
digitalWrite(led, LOW);
}
}
// send a standard http response header
client.println("HTTP/1.1 200 OK");
client.println("Content-Type: text/html");
client.println("Connnection: close");
client.println();
client.println("");
client.println("
client.println("");
client.println("");
client.println("
");
client.println("
Control Arduino's LED
");
client.print("
");
client.println("");
break;
}
if (c == '\n') {
// you're starting a new line
currentLineIsBlank = true;
}
else if (c != '\r') {
// you've gotten a character on the current line
currentLineIsBlank = false;
}
}
}
// give the web browser time to receive the data
delay(1);
// close the connection:
client.stop();
Serial.println("client disonnected");
}
if(SET == "on"){
digitalWrite(led, HIGH);
}else{
digitalWrite(led, LOW);
}
if(SET == "off"){
digitalWrite(led, LOW);
}
}
Upload code ลงใน board นะครับ เมื่อ load เสร็จก็รอประมาณ 2-3 วินาทีครับดูที่บอร์ดนะครับ มี LED ที่ internet shield ติด เรียงกัน 4 ดวงนะครับ
ถ้าไม่ติดกด reset board ดูนะครับหรือไม่ก็ตรงสอบสาย LAN ว่าต่อไว้ดีหรือไม่ ต้องมีinternet นะครับ
เมื่อทุกอย่าง OK ก็ลองเปิดเวปไปที่ 192.168.1.177 นะครับ
จะได้ดังภาพนี้นะครับ
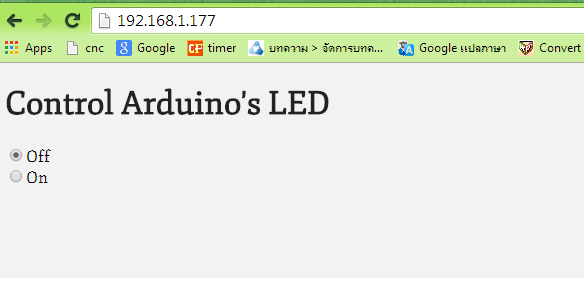
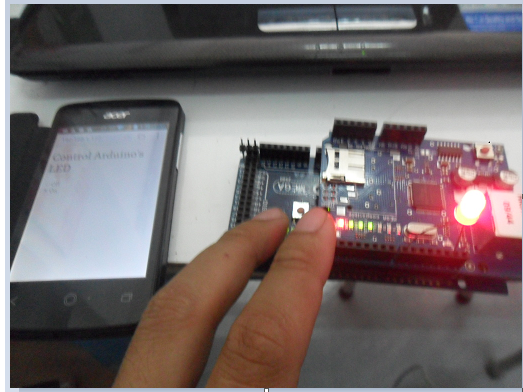
ลองกดปุ่ม ON/OFF ที่หน้าจอดูนะครับ จะเห็น LED ติด และดับเมื่อกด OFFครับ
เราสามารถใช้ Android เปิดเวปแล้ว control LED ได้ครับ