


arduino With 4 LCD
arduino แสดงผลออก LCD โดยสามารถแสดงผลได้ถึง 4 หน้าจอและสามารถประยุกต์ให้สามารถแสดงออกได้มากกว่า 4 หน้าจอ
ก่อนอื่นของขอบคุณที่มาจาก
http://www.hackmeister.dk/2010/08/4-lcd-displays-on-1-arduino/
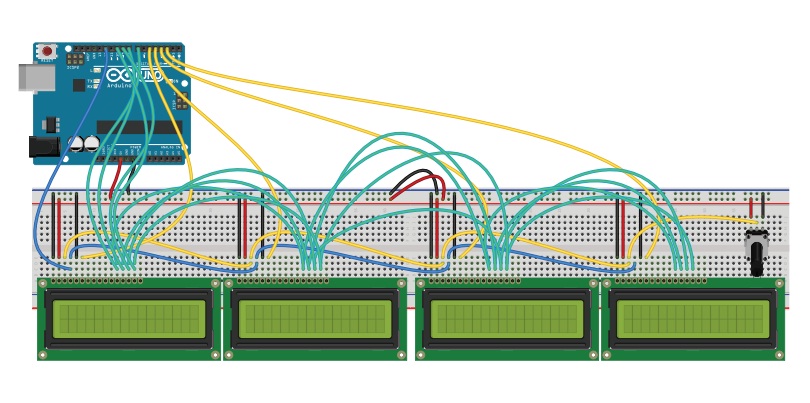
การต่อให้ arduino แสดงผลแบบ 4 หน้าจอก็ไม่ต่างกันกับการแสดงผลออด 1 หน่าจอ มีจุดต่างกันที่ ขาเดียวที่ทำการแยกว่าจะเขียนข้อความออกตัวหนาจอ LCD ตัวใด
นั้นมาดูวงจรการต่อกันเลยนะครับ
ต่อมา มาดูในส่วนของ code กันครับ
lcd1.setCursor(0, 0); แสดงออกบรรทัดที่ 1
  lcd1.print("Disp1");       คำสั่งในส่วนนี้ จะเป็นคำสั่งที่ใช้ในการแยกการแสดงผลแต่ละจอ
  lcd2.print("Disp2");
  lcd3.print("Disp3");
  lcd4.print("Disp4");
lcd1.setCursor(0, 1); แสดงออกบรรทัดที่ 2
  lcd1.print("HELLO1");       คำสั่งในส่วนนี้ จะเป็นคำสั่งที่ใช้ในการแยกการแสดงผลแต่ละจอ
  lcd2.print("Disp2");
  lcd3.print("Disp3");
  lcd4.print("Disp4");
code ตัวอย่างที่ใช้ในการทดสอบครับ
// include the library code: #include <LiquidCrystal.h> // initialize the library with the numbers of the interface pins LiquidCrystal lcd1(12, 5, 7, 8, 9, 10); LiquidCrystal lcd2(12, 4, 7, 8, 9, 10); LiquidCrystal lcd3(12, 3, 7, 8, 9, 10); LiquidCrystal lcd4(12, 2, 7, 8, 9, 10); void setup() { // set up the LCD's number of rows and columns: lcd1.begin(16, 2); lcd2.begin(16, 2); lcd3.begin(16, 2); lcd4.begin(16, 2); // Print a message to the LCD. lcd1.print("Disp1"); lcd2.print("Disp2"); lcd3.print("Disp3"); lcd4.print("Disp4"); } void loop() { // set the cursor to column 0, line 1 // (note: line 1 is the second row, since counting begins with 0): lcd1.setCursor(0, 1); lcd2.setCursor(0, 1); lcd3.setCursor(0, 1); lcd4.setCursor(0, 1); // print the number of seconds since reset: lcd1.print(millis()/1); lcd2.print(millis()/10); lcd3.print(millis()/100); lcd4.print(millis()/1000); }
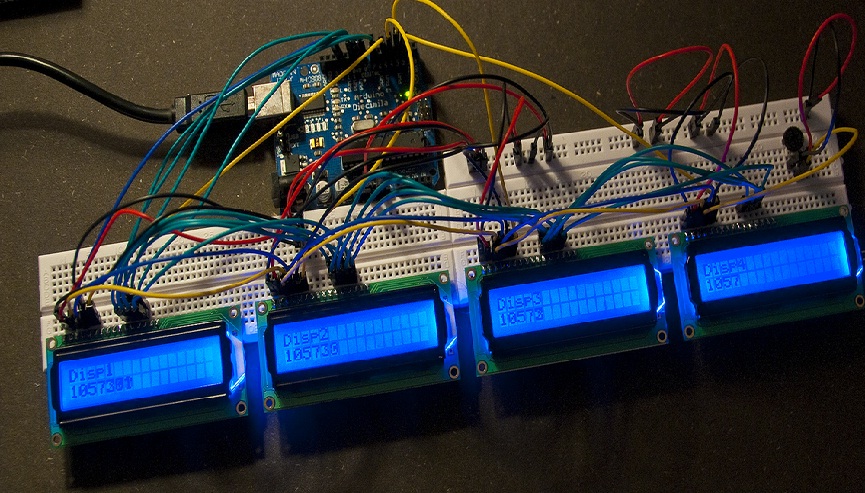
เมื่อต่อวงจรตามภาพเสร็จ ทำการ upload code เราจะเห็นการแสดงผลออกทาง LCD แต่ละหน้าจอที่ไม่เหมือนกันครับ เพียงเท่านี้เราก็สามารถแสดงผล
ออกทาง LCD แบบ 4 LCD ได้แล้วครับ
ขอบคุณครับ ขอให้สนุกกับการเขียน micro