


Arduino with TB6560 Drive step motor แสนง่าย
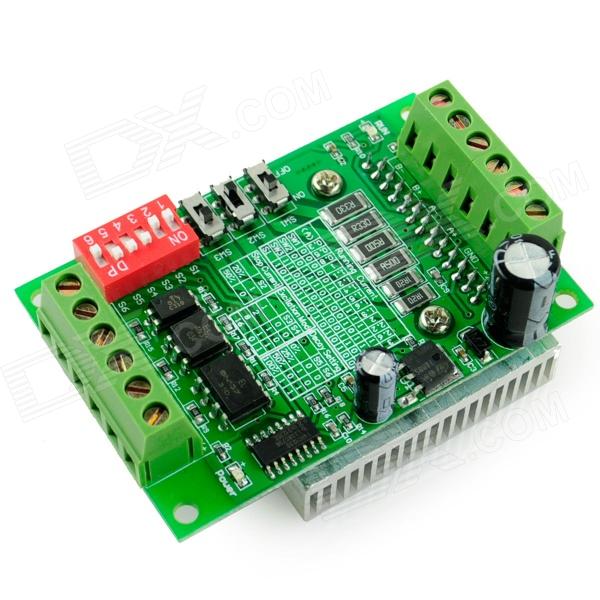
ก่อนอื่นเรามาดูบอร์ด Drive motor TB6560 มีหลายแบบแล้วแต่คุณจะเลือกรุ่นไหน
ลิงค์สินค้าที่เกี่ยวข้อง
http://www.circuitshops.com/articles/42107947/TB6560-3A-stepping-motor-drive-stepping-motor.html
คุณสมบัตรของบอร์ดรุ่นนี้ ครับ
- Working voltage :DC 10V-35V.Recommend Switching Power Supply DC24V
- 6N137 high-speed OptoCoupler , to ensure a high speed without step out.
- New original Toshiba TB6560AHQ chip, low-voltage shutdown, of overheating parking and over-current protection circuit to ensure optimal performance.
- Rated output: ± 3A ,peak 3.5A.
- For 42,57,86 Stepper within 3A 2/4 -phase / 4 wire / 6 wire stepper motor, not fit for more than 3A stepper motor.
- Automatic half-decay.
- Excitation Mode: synchronizing, half step, 1/8 step, 1/16 step, a maximum of 16 segments.
- Volume: 50 x 75 x 35 ( MM)
Characteristics :
- the current level adjustable to meet your various application needs.
- the Automatic half-decay adjustable.
- 6N137 high-speed optical coupling, to ensure a high speed not step out.
- thick tooth radiators, good heat dissipation.
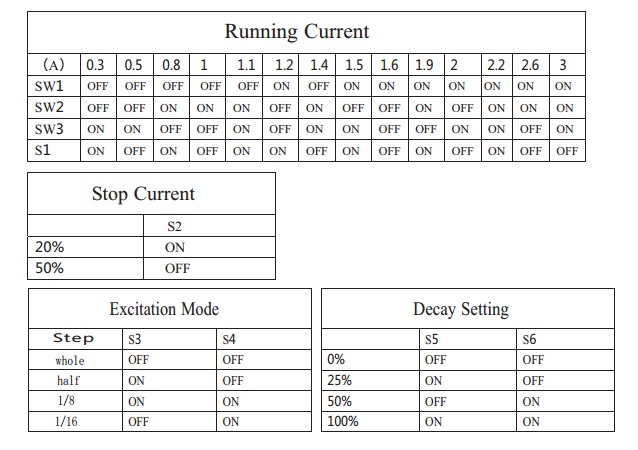
ส่วนตารางนี้เอาไว้สำหรับการปรับตั้งค่า step นะครับสามารถปรับตั้ง ให้เข้ากัวตัว motor ของเราครับ
******** ต่อมามาดูการต่อวงจร ระหว่าง Arduino UNO + Drive Motor TB6560 ********
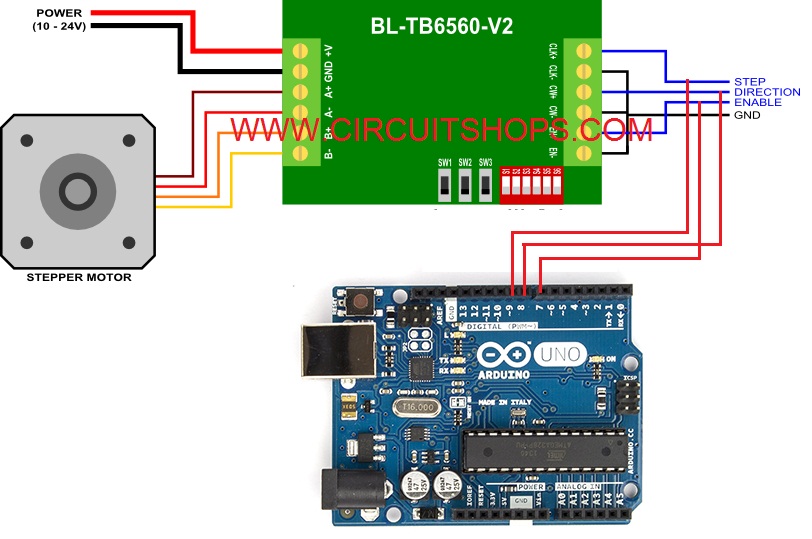
หลังจากการต่อ วงจรเสร็จนะครับ มาตั้งค่าตัว step motor กันนะครับ
ให้เลื่อน สวิตซเลื่อน SW1 SW2 SW3 ไปตำแหน่ง ON
ให้เลื่อน DIP switch S1 S2 ไปตำแหน่ง OFF
ให้เลื่อน DIP switch S3 ไปตำแหน่ง ON
ให้เลื่อน DIP switch S4 S5 S6 ไปตำแหน่ง OFF
สามารถจ่ายไฟเลี้ยง 12-24VDC
*** อย่าลืมต่อ GND ระหว่างบอร์ด Arduino กะับบอร์ด Drive motor นะครับ
*** การต่อกับ Step motor ต้องต่อให้ถูก Phase นะครับ ***
A+ A- B+ B-
ต้องหาเฟสของ Motor ก่อนต่อนะครับ หรือไม่ก็ดูจาก Data sheet ของ Motor รุ่นนั้นๆ ครับ
ต่อมามาดู Code กันครับ
int Distance = 0;
void setup() {
pinMode(9, OUTPUT);
pinMode(8, OUTPUT);
pinMode(7, OUTPUT);
digitalWrite(7, LOW);
digitalWrite(8, LOW);
digitalWrite(9, LOW);
}
void loop() {
digitalWrite(9, HIGH);
delayMicroseconds(200); // เอาไว้ประบความเร็ว ของ Motor
digitalWrite(9, LOW);
delayMicroseconds(200); // เอาไว้ประบความเร็ว ของ Motor
Distance = Distance + 1; // เพิ่มค่าตัวแปร
if (Distance == 6200) { เมื่อได้ครบที่กำหนดแล้วก็จะกลับทางหมุน motor
if (digitalRead(8) == LOW)
{
digitalWrite(8, HIGH); }
else
{
digitalWrite(8, LOW);
}
Distance = 0; // reset ค่าตัวแปร
}
}
เมื่อ Up loadcode เสร็จก็จะเห็นการทำงานของ Motor step หมุนไปและหมุนกับครับ
ขอให้สนุกกับการเขียน Micro
clip ตัวอย่างการทำงานของโปรแกรม